Flooring adds great value to a home and should last a lifetime. It also makes a significant difference in comfort underfoot.
The latest flooring is more stylish and durable than ever. For example, vinyl now incorporates realistic images of reclaimed barn wood that look chic in a den. New porcelain tiles can pass for Calacatta marble in a luxe powder room. Visit https://www.helenaflooringpros.com to learn more.
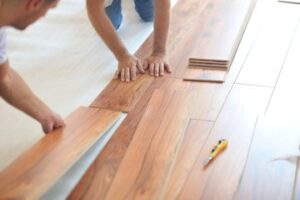
Laminate flooring is a great alternative to hardwood for many homeowners, especially since it is more affordable. It is also easier to install because of its tongue-and-groove construction. However, installing laminate can be a bit of a challenging project for the first-time installer. To make things a little easier, the right tools can be helpful for a quality result.
A laminate shear is a great tool to use for cutting the laminate planks to length. This tool allows for quick and accurate cuts, and it is easier to control than a miter saw. The shear is also lighter in weight than a jigsaw, which can be tiring to use for a long period of time.
Using a shear for cutting the laminate also helps eliminate any damage that may be caused by an overly sharp blade on a saw or by trying to cut the planks with a power saw. A shear is also useful for creating an expansion gap around the perimeter of the room. This is important for laminate floors, as they expand and contract with changes in temperature and humidity. To create the proper gap, simply cut 1/4″ spacers out of scrap material and place them every one to two feet along the wall.
It is also a good idea to start the installation of your laminate at the doorways, as this will make it easier to undercut jambs and trim. A professional flooring pro also recommends installing the underlayment perpendicular to the way the laminate planks are installed, as this can reduce the likelihood of crinkling noises. In addition, all underlayment seams should be taped with seam tape. This can be purchased at most home improvement stores, although a more durable house wrap tape is also an option.
Start at the Doorway
Flooring is a key design feature that can make a major impact on a space. It can affect the style, feel, and functionality of a room, so it is important to consider all factors before making a final decision. From carpet and vinyl to hardwood and laminate, there are many options available. To make the best choice, it is critical to understand the advantages and disadvantages of each type of flooring material.
While it’s possible to install flooring yourself, it’s often best to hire a professional. They have the tools and expertise needed to complete the project quickly and correctly. Plus, they can help you find the perfect flooring materials to suit your needs and budget. They may even be able to offer financing, which can make it easier to pay for the installation.
When you’re choosing a flooring company, it’s important to read reviews, especially those from current customers. These can provide helpful insights into the quality of the work, how well the company communicates with clients, and more. You can also check out the company’s website to see what kind of flooring they specialize in and what their typical installation process looks like.
Whether you’re planning to use natural, organic, or recycled materials, you should always look for low-VOC wood finishes and sealants. These will reduce off-gassing and help protect your health. In addition, it’s a good idea to avoid composite wood products, as they are typically made using glues that release formaldehyde into the air. This is a known human carcinogen and serious home air pollutant, so opt for low-VOC products instead.
Cut Laminate with a Miter Saw
A miter saw is essential for making a variety of cuts that are required to install laminate flooring. You can rent one from your local home improvement store or a tool rental center. It is also worth purchasing if you plan on installing many floors in the future. This type of saw will allow you to make crosscuts, rip cuts and even curved cuts. You will need a laminate flooring cutter blade to ensure you get clean and chip-free cuts. This blade has heat expansion slots that dissipate built-up heat and a nonstick coating to protect the blade from heat, gumming and corrosion. Its high alternate top bevel design combines small teeth that face in alternating directions to cut laminate boards with minimal splintering.
When you are making a curved cut, start by measuring the length and width of the obstacle you need to fit around. Use a tape measure to mark this measurement on the back of the board you will be cutting. Next, add 1/4 inch to this measurement. This extra space will prevent the laminate flooring from buckling during installation. You can then cut the laminate board to this size.
If you do not have a miter saw, a handsaw can be used. This is not as efficient as a miter saw but it can still give you clean, professional-looking cuts. When using a handsaw, be sure to wear safety goggles and gloves to protect your hands. You will also want to clamp the piece of laminate you are cutting down, if possible.
A jigsaw is another good option for making curved cuts in laminate flooring. It is easier to use than a handsaw and can be more precise, especially if you are trying to cut an intricate shape. If you are using a jigsaw, be sure to use a metal-cutting blade with a tooth count of 14 tpi or higher for the best results.
Use Seam Tape
Taping seams of underlayment may seem like a minor detail during flooring installation, but it is essential for creating a flat surface. Neglecting to tape seams can result in uneven floors that will require costly repairs down the road. In addition, gaps in the floorboards can pose a tripping hazard for you and your family. Taping the seams can also help prevent dirt and debris from penetrating the subfloor and causing damage to your new flooring.
When it comes to taping the seams of your underlayment, you’ll want to use a high-quality tape that is designed specifically for flooring. While duct tape or masking tape may work for some applications, it is best to use a tape that is made of strong materials and designed for flooring installation. This type of tape will be durable and able to stand up to foot traffic.
Before you apply your tape, make sure that the area is clean and free of debris and dust. This will ensure that the tape adheres properly and stays in place throughout the installation process. Once you’ve cleaned the area, follow the manufacturer’s instructions for applying the tape to the seams of your underlayment.
Some underlayment products come with a built-in seam tape that eliminates the need to use additional tape. However, if your underlayment doesn’t have built-in seam tape, you can purchase flooring seam tape from a home improvement store. This type of tape is a heavy-duty, contractor grade construction seaming tape that’s easy to use. This tape has a kraft backing and features a contractors grade adhesive that will last through renovations, do-it-yourself projects, and construction jobs.
Install Underlayment Perpendicularly
Floors are a vital part of any home or commercial structure, providing comfort and safety for occupants. They may be constructed from wood planks supported by joists, concrete slabs poured on a foundation, or a combination of these elements. They must support their own weight as well as the load of furniture and the people that walk on them. They also need to be able to resist the movement of water and air.
In construction, builders often apply a plywood underlayment to the floor framing as a base for the flooring finish material. The underlayment consists of sheets of plywood with tongue-and-groove edges that interlock for a secure installation. The underlayment is laid perpendicular to the floor joists for maximum strength and stability. This is a relatively simple procedure and it will ensure that any dents or bumps in the underlayment won’t show through the finished flooring.
Before installing the underlayment, remove any paint or stains and sweep up all nails, screws, staples, and other debris. The underlayment should be installed on dry subflooring. Moisture in the subflooring can cause the underlayment to expand, creating gaps between each panel that can lead to buckling.
During the installation of the underlayment, make sure all seams are taped. This will keep water and other materials from seeping between the underlayment and the underlying subflooring. Use a high-quality waterproof tape. Avoid using house wrap or packing tape, as these can cause an annoying crinkling sound when stepped on.